A neat sealant edge makes a big difference in any room. Whether in the bathroom, kitchen or around windows: proper sealant application and finishing not only ensures a clean look, but also protects against moisture, mould and dirt build-up. Yet in practice, it turns out to be trickier than it seems. Uneven seams, loose sealant or visible smudges are common frustrations. With the right preparation, technique and products - such as SuperCleaners's Super Finisher 500ml - you can achieve a professional result.
Preparation kit application
For a beautiful, durable finish, everything starts with a clean and grease-free substrate. Old sealant, dust or grease residue can cause new sealant to adhere poorly and come off faster. Therefore, always remove the old layer first with Super Silicone Remover. This product softens old sealant, allowing you to easily remove the remains without damaging the substrate.
Then clean the surface thoroughly with Super Pro All Purpose Cleaner & Degreaser. This removes grease, soap residue and dust - perfect for bathrooms, kitchens and window frames. Then let the surface dry thoroughly before you start. For a tight edge, you can apply painter's tape along the joint; this will prevent you from slipping with the sealant sprayer.
Wanted more information on kit removal? Then take a look at here our blog on kit removal.
Applying sealant: how to do it
After cleaning and degreasing, you can apply new sealant. Choose a suitable sealant for your job - for example, mould-resistant sanitary sealant in the bathroom or universal sealant for window frames and kitchens.
For a really tight end result, use when finishing the Super Finisher 500ml. This ready-to-use spray prevents the sealant from sticking to your tools and allows you to smooth the joint perfectly. Even if you are not an experienced handyman, with the Finisher you get professional, even joints without smudges or unevenness.
Step-by-step plan for applying new sealant:
Stick painter's tape along the joint for clean lines.
Cut the nozzle of the sealant tube at an angle, slightly narrower than the joint width.
Place the tube in the sealant gun and pull the trigger evenly across the joint.
Fill the joint in one smooth motion, without interruptions.
Spray Super Finisher 500ml directly onto the fresh sealant and adjacent surfaces.
Smooth the joint with a jointing wood, PVC pipe or putty knife. Lightly moisten the tool for an extra tight result.
Then let the sealant cure completely - usually this takes 24 hours. During this time, avoid contact with water or cleaning agents.
Looking for more extensive information? Then check here our blog on applying new sealant!
Finishing kit is how you do it:
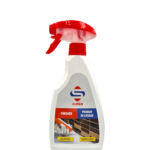
SUPER Finisher 500ml
- Suitable for all types of sealant
- In a handy ready-to-use spray bottle
- Biodegradable
The finish determines the final result. Many DIYers use washing-up liquid or soapy water to smooth sealant, but this is not a good idea: it corrodes the sealant and weakens adhesion. The Super Finisher 500ml has been specially developed to smooth sealant safely and professionally without leaving residues or stains.
Spray the Super Finisher onto the joint and surrounding surfaces immediately after applying the sealant. Then use a jointing stick, PVC pipe or putty knife to smooth the joint in one fluent movement. Thanks to the spray, the sealant will not stick to your tools and the surface will remain nice and even.
Then let the sealant cure thoroughly. If the joint is later painted over, rinse with clean water for best adhesion.
Benefits of the Super Silicone Remover
Suitable for all types of sealant - silicone, acrylic, butylene and universal
Biodegradable and free of hazard symbols
Handy spray bottle, ready to use immediately
Ensures a smooth, even and professional end result
Safe to use indoors and outdoors
After kitting: curing and maintenance

SUPER Multi Heavy Degreaser & Cleaner
- Heavy cleaner
- Fast and versatile
- In a handy spray bottle
Let the new sealant cure for at least 24 hours before using the room again. In damp rooms such as bathrooms or kitchens, this may take a little longer. Afterwards, clean the joints regularly with The Super Multi Heavy degreaser & Cleaner. This product keeps joints hygienically clean and prevents mould growth, without affecting the sealant.
You use SUPER Multi Heavy Degreaser & Cleaner like this:
- Spray the product on the contamination
- Give the product a short soaking period of a few seconds for light soiling, up to 1 minute for heavy soiling
- Do not let the product dry up
- Then clean the surface with a damp microfibre cloth or scouring pad
Want to know more about sealant application and finishing?
Want to remove old sealant before applying new?
Or are you curious about the full step-by-step plan for sealant removal and application?
Read then:
Remove sealant residue - the basis for a clean finish
Kit removal and application - tight joints step by step
Order the Super Finisher now
Want tight, professionally finished sealant joints yourself?
With the Super Finisher 500ml, you get that result in no time.
Spray, smooth and ready - with no smudges or residue.